Installing Locally using Docker
Is this the best install method for you?
In most cases, we recommend doing an internet-based installation on Heroku instead. If you decide to do a local installation, be sure to read our page on local installations to help you understand what’s going on, particularly this section: Should I use a local installation?
Attention
If you need an offline copy of Tabbycat, installing using Docker should be simpler and quicker than using the « Install Locally on… » instructions for your operating system. However if a Docker installation doesn’t work as outlined below, it’s harder to address what isn’t working. If you encounter any problems with Docker, we recommend using the « Install Locally on… » option as a fallback, but if you need to do so, please also report the issue you’re having on GitHub or contact the developers.
Docker is an application that makes it very easy to load and run a specific collection of software. It allows us to bundle everything necessary to run Tabbycat into a single package rather than have users install everything needed step-by-step. Once set up, Docker will allow you to start and stop a webserver (that in turn runs Tabbycat) on your computer whenever you want and without the need for internet access.
1. Download Tabbycat
Download the zip or tar.gz file.
Extract all files in it to a folder of your choice.
2. Install Docker
If using macOS
Install the Docker Desktop for Mac from the Docker store page.
If using Linux
Install the Docker Engine for your OS from the Docker store page.
If using Windows 10 Pro, Enterprise, or Education Edition
Install the **Docker Desktop for Windows* from the Docker store page.
Before or shortly after installing it, Docker may ask you to enable hypervisor and restart your PC. If it asks you this follow the prompts and restart as asked.
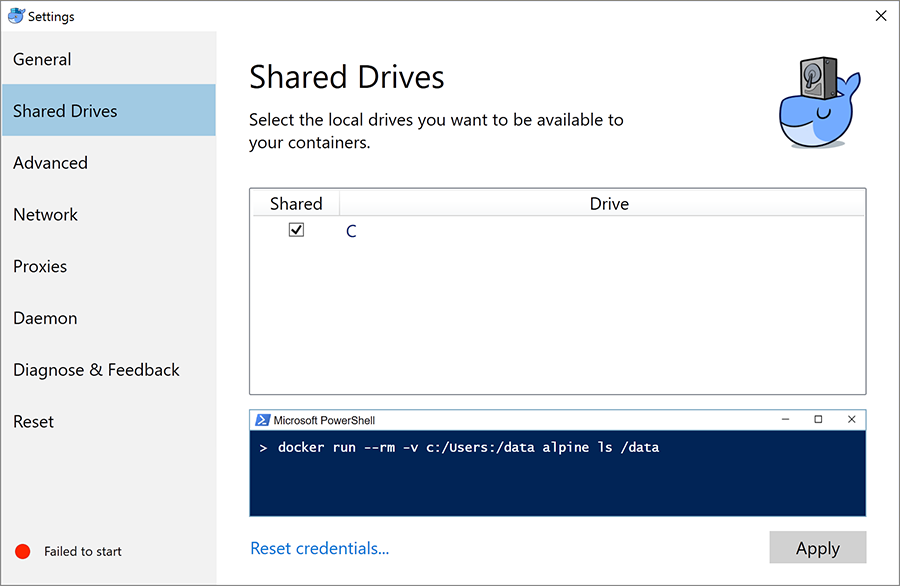
Once Docker has finished installing, open up the newly-installed Docker application, then right-click the app’s icon (the whale) in the Taskbar.
From there, hit Settings in the menu and Shared Drives in the sidebar. Tick the checkbox next to your hardrive and then click Apply. After that has applied exit and reopen the docker app (ie right-click the taskbar icon and hit exit) and verify that the checkbox is still there.
If using Windows 7, Windows 8, or Windows 10 Home Edition
Install the Docker Toolbox from the Docker Toolbox downloads page.
Astuce
Not sure which edition of Windows you have? Click Start, search for « System », and open the Control Panel item « System ».
3. Run Tabbycat in Docker
If using the Docker App
These instructions apply if you installed the Docker App, i.e., if you are using macOS, Linux or Windows Pro/Enterprise/Education.
Ensure that Docker application is open (there should be a whale icon in your menu/task bar) and that it says that Docker is running.
Browse to the location where you extracted Tabbycat to. Open up the bin folder there. Within that folder:
If you’re on macOS, press the Control key, click the icon for osx_docker_start.command, then choose Open from the shortcut menu.
If you’re on Windows, open windows_docker_start.bat.
If you’re on Linux, open up a terminal in the Tabbycat folder (i.e. the folder containing
README.md) and rundocker-compose up.
A terminal window should popup and bunch of text scroll by. If this is your first time running Docker it may take a while (30 minutes or more) to download the virtual machine. When the text has stopped scrolling by you should see a Finished building Tabbycat! message.
Open up http://localhost:8000/ (Windows) or http://0.0.0.0:8000 (OSX/Linux) in a browser of your choice!
Note
If you want to reopen Tabbycat at a later time (say after restarting) repeat steps 1 through 4 here.
If using the Docker Toolbox
These instructions apply if you installed the Docker Toolbox, i.e., if you are using Windows 7, Windows 8 or Windows 10 Home.
Start the Docker Quickstart Terminal.
Run the command
docker-machine ip. Take note of the IP address it shows, for example:$ docker-machine ip 192.168.99.100
Navigate to the Tabbycat folder (i.e. the folder containing
README.md) and rundocker-compose up.Open a browser and go to http://192.168.99.100:8000/, replacing « 192.168.99.100 » with whatever IP address was shown in step 2.
Once you’re done and want to stop the Tabbycat server, press Ctrl+C, wait until the next prompt appears, and then run
docker-machine stop.
Note
If you want to reopen Tabbycat at a later time (say after restarting) repeat steps 1 through 4 here.