Installing on Heroku
When running Tabbycat on the internet, we set it up on Heroku. The project is set up to be good to go on Heroku, and it works well for us, so if you’d like to run it online, we recommend that you do the same. Naturally, this requires you to have a Heroku account.
Installation—the short way
Click this button:

This is the easiest way to deploy an instance of Tabbycat online. It requires no technical background.
If you don’t already have a Heroku account, it’ll prompt you to create one. Once you’re logged in to Heroku, choose a name for your installation, then scroll down and click Deploy. Once it’s finished, click View and follow the prompts. Once finished, open the site and from there you can easily set up a demo data set (if you just want to learn Tabbycat) or use the data importer to set up a real tournament.
Note
During the setup process Heroku will ask you to verify your account by adding a credit or debit card. A standard Tabbycat site will not charge your card without explicit permission — charges only accrue if you deliberately add a paid service in the Heroku dashboard.
That said if you do not have access to a credit/debit card we offer a version of the software — ‘Tabbykitten’ — that does not require Heroku to verify your account. However, as a result, this version is limited: it does not send error reports to the developers and can handle much less public traffic. We strongly recommend using it only as a last resort, and even then only for small tournaments. Use this link to set up a Tabbykitten site.
If you have a background in programming, you might prefer the method below.
Installation—the long way
The long way sets you up with more control over your environment. Because you’ll clone our GitHub repository, it’ll be easier for you to pull and contribute updates to the source code. We recommend it if you have experience with Git. It’s also easier with this method to import CSV files using the command-line importer, so if you have a very large tournament, this might make importing initial data easier.
We’ve tested these instructions successfully on Windows, Linux and Mac OS.
Requisite technical background
You need to have at least a passing familiarity with command-line interfaces to get through the longer traditional method. We’ll talk you through the rest.
When we say “command shell”, on Windows we mean Command Prompt, and on Linux and OS X we mean Terminal (or your favourite command shell).
Advanced users
Tabbycat is a Django project. As such, it can be installed on any web platform that supports Django, using any SQL system that Django supports. Just be aware that we haven’t tried any other platform.
Short version
git clone https://github.com/czlee/tabbycat.git
git checkout v1.2.3                               # or master
cd tabbycat
python deploy_heroku.py <yourappname>
If you want to import tournament data from CSV files, put them in data/<yourtournamentname>, then:
git commit -am "Add data for <yourtournamentname>"
git push heroku master
heroku run tabbycat/manage.py importtournament <yourdatadirectoryname> --slug <slug> --name <Your Awesome Tournament> --short-name <Awesome>
1. Install dependencies
- Install the Heroku Command Line Interface (CLI), then log in with the command
heroku login. - Windows users need to install Python. Follow (only!) part 1(a) of our Windows instructions.
- If you don’t already have Git, follow the instructions on the GitHub website to set up Git.
Note
Linux and OS X users probably already have Python installed. There is no need to install Python 3 specifically. Although Tabbycat uses Python 3, installing it on Heroku relies only on the deployment script, which is compatible with both Python 2 and Python 3.
2. Get the source code
Open a command shell. Navigate to an appropriate directory on your computer using cd (creating directories using mkdir as appropriate), then run:
git clone https://github.com/czlee/tabbycat.git
git checkout v1.2.3                               # or master
Tip
If this is your second time creating a Tabbycat instance on Heroku from this computer, you don’t need to clone the repository a second time. Just run git pull to update the code to the latest version, and press ahead to step 3: Deploy to Heroku.
3. Deploy to Heroku
Navigate to your Tabbycat directory:
cd path/to/my/tabbycat/directory
Run the script to deploy the app to Heroku. Replace
<yourappname>with your preferred URL. Your website will be at<yourname>.herokuapp.com.
python deploy_heroku.py <yourappname>This script has other options that you might find useful. Run
python deploy_heroku.py --helpfor details.Note
If you’d prefer to import tournament data locally and push the database to Heroku using
heroku pg:push, use the--no-init-dboption to preventdeploy_heroku.pyfrom running initial migrations on the database.Note
If this isn’t your first tournament, the
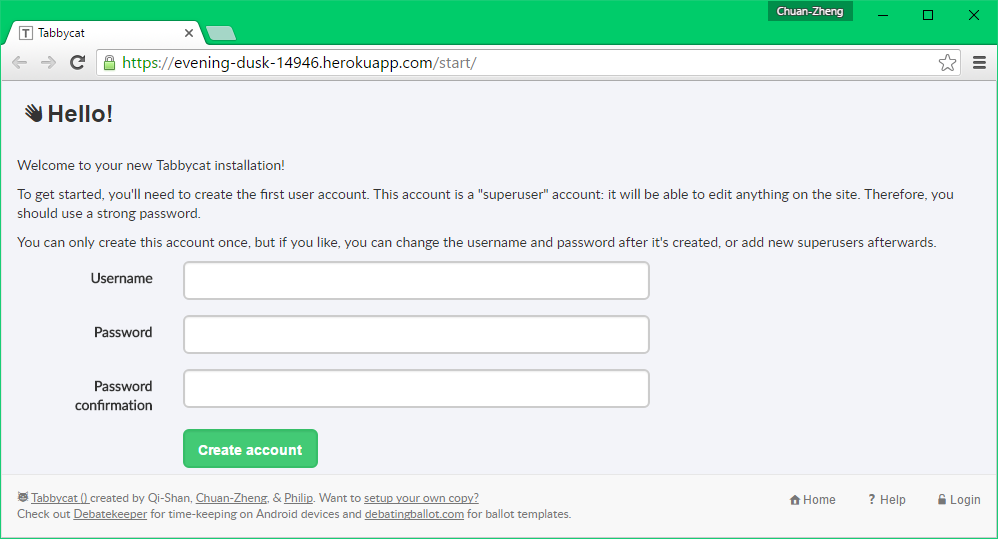
herokuGit remote might already be pointing to your first tournament. In this case, you should use the--git-remote <new_remote_name>option to get the script to create a new git remote for you, so you can use when importing tournament data.When this script finishes, it will open the app in your browser. It should look something like this:
4. Import tournament data
Note
This step is optional and there are other methods of importing data. However the following method is most useful for large tournaments where manual entry would be tedious.
In order to use the importtournament command directly on the server, your data also needs to be on the server. The easiest way to get this data on to the server is to make a Git commit and git push it to the server.
Place your CSV files in
data/yourtournamentname, as described in Importing Initial Data.Commit and push:
git commit -am "Add data for <yourtournamentname>"
git push heroku master
Note
If you use
--git-remotein step 3 to create your own Git remote, you should use that remote name instead ofherokuin the last command above.Advanced users
You might like to create a new branch to keep this data off your master branch.
Run this command, replacing
<fields>with your own names:heroku run tabbycat/manage.py importtournament <yourdatadirectoryname> --slug <slug> --name <Your Awesome Tournament> --short-name <Awesome>
Addons
For Australs 2014, we found that the hobby-dev plan of Heroku Postgres didn’t allow for more than 10,000 database rows, so we upgraded to hobby-basic, which was enough (and costs a few dollars). At the end of that tournament, we had about 20,000 rows. For similar-sized tournaments (84 teams, 8 prelim rounds), you’ll probably find your usage about the same, wheras small tournaments should fit within the 10,000 row limit easily.
If you’re not sure, you can always start at hobby-dev—just be prepared to upgrade during the tournament if you run close to capacity.
Custom domain names
Your Heroku app will be available at yourappname.herokuapp.com. You may want it to be a subdomain of your tournament’s website, like tab.australasians2015.org. Instructions for this are in the Heroku documentation. Basically there are two things to do:
Add a DNS entry to your website, with record
CNAME, nametab(or whatever you prefer) and targetyourappname.herokuapp.com. You’ll need to figure out how to do this with your tournament website hosting service (which is probably not Heroku).Add a custom subdomain to Heroku, like this:
heroku domains:add tab.yourwebsite.com