Venue Constraints
Tabbycat supports a basic form of venue constraints. A venue constraint is a requirement that a particular team, adjudicator, institution or division be assigned to a venue in a particular venue category. Typical uses would include:
- Meeting venue accessibility requirements of particular teams (e.g. step-free access)
- Placing adjudication core and tab team members close to the tab room
- Keeping all debates in a division in one location
Constraints apply to venue categories, not individual venues. That is, you specify that (say) a team should be given a venue from a particular list of venues. Of course, it’s permissible for a venue category to have only one venue in it.
The algorithm used to satisfy venue constraints is not guaranteed to be optimal. In some rare cases, it may propose an allocation that fails some constraints, even though some other allocation would have satisfied all (or more) constraints. In almost all practical circumstances, however, it should work, and save human effort (and time) in specially allocating rooms.
Adding venue categories
Before you add venue constraints, you first need to add venue categories. Each venue category is a list of venues, typically satisfying a particular need. For example, you might have a category for each of the following:
- Venues with step-free access
- Venues that are close to general assembly (the briefing room)
- Venues that are close to the tab room
- Venues that are, or venues that are not, being live-streamed
Each venue can be in as many categories as you like (or none at all).
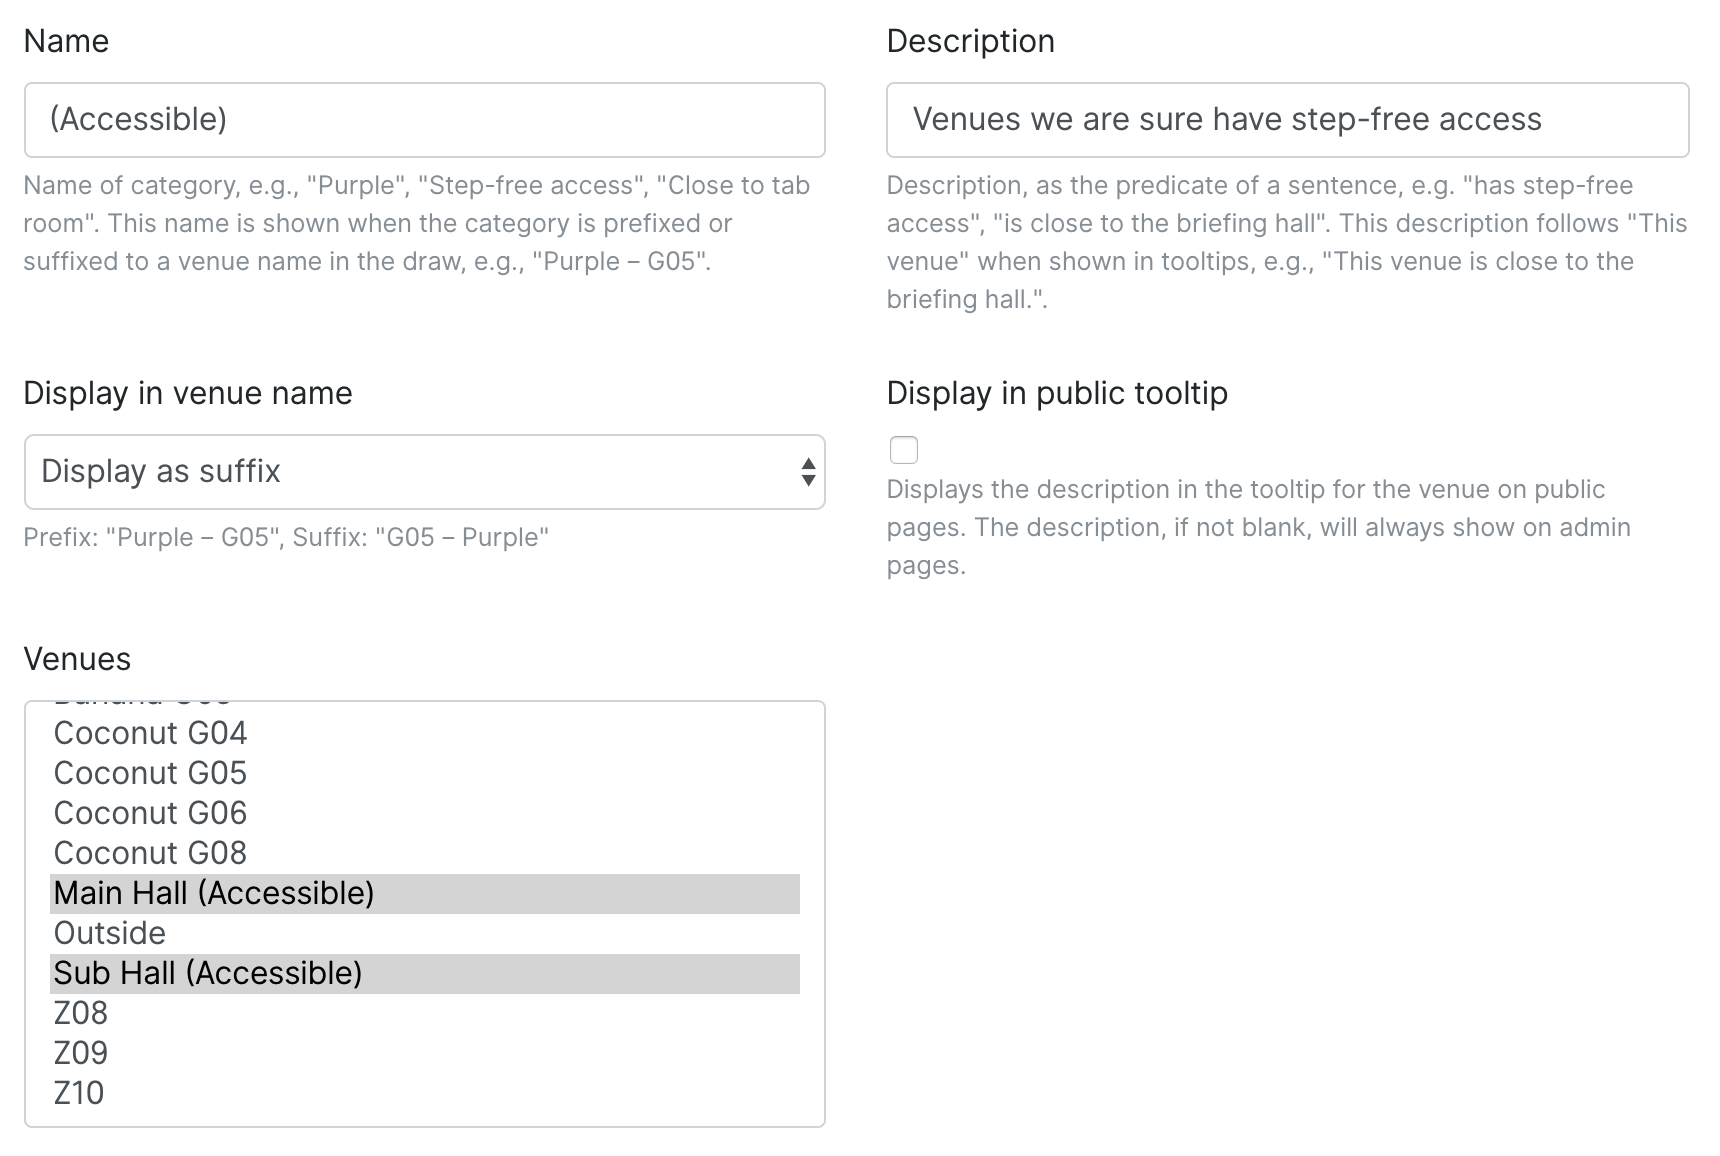
To add or edit venue categories, go to the Import Data area (under Setup) then select Add/Edit Venue Categories. Note that this page will show all existing Venue Categories first before showing the blank forms that allow you to create new categories. Give your category a name (like “Step-free access”), assign it some venues, then click the “Save Venue Categories” button at the bottom of the page.
Alternately you can add or edit a venue category by going to the Edit Database area (under Setup), scroll down to “Venues” and click “Venue categories”. Then click the + Add venue category button in the top-right of the page or click an existing item.
Adding venue constraints
To add or edit venue constraints, go to the Import Data area (under Setup) then select Add/Edit Venue Constraints. Note that this page will show all existing Venue Constraints first before showing the blank forms that allow you to create new categories. Note that the “Constrainee ID” field should let you select from a dropdown or type in the name of an adjudicator, institution, or team (rather than having to lookup the exact ID).
Alternately you can add or edit a venue category by going to the Edit Database area (under Setup), scroll down to “Venues” and click “Venue constraints”. Then click the + Add venue category button in the top-right of the page or click an existing item.
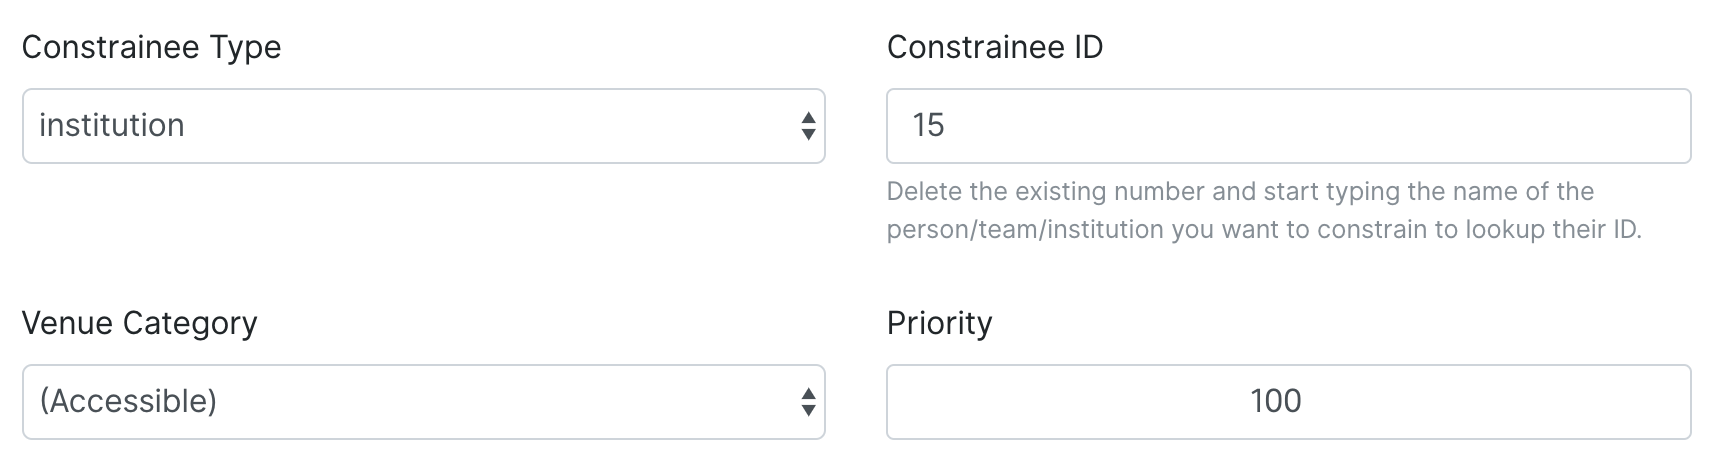
For each constraint, you need to specify four things:
| Category | The venue category to which the subject of this constraint should be locked. |
| Priority | This is a number used to resolve conflicts between constraints. Constraints with higher priority (greater number) take precedence over those with lower priority. If none of your constraints will ever conflict, then the priority is arbitrary (but it must still be specified). |
| Subject content type | The type of subject to which this constraint relates: adjudicator, team, institution or division. |
| Subject ID | Which adjudicator, team, institution or division the constraint relates to. The textbox takes a number (the ID of the object in the database), but you can search for the subject by clicking on the search icon next to it. This will bring up a table of objects of the type specified in “subject content type” for you to choose from. (You need to select the subject content type first.) |
Applying venue constraints
If you don’t have any venue constraints for adjudicators, venue constraints are applied automatically when the draw is generated.
However, if you have one or more venue constraints for adjudicators, it’s not possible to take adjudicator venue constraints into account during draw generation, because the adjudicator allocation isn’t known then. You’ll need to run the venue allocation yourself after you’ve allocated adjudicators.
To run venue allocation, go to Edit Venues (while looking at the draw), then in the screen where you can edit venues, click the Auto Allocate button. You can also do this at any other point (say, after adding a new venue constraint) if, for whatever reason, you would like to re-run the venue allocation algorithm.
If a venue constraint couldn’t be met, a message will show in the “conflicts/flags” column of the draw. A constraint might not be met for a number of reasons:
- It could be that constraints of different parties (say, one team and one adjudicator) conflicted, so only one could be fulfilled.
- It could be that all available rooms in the relevant category were already taken by other, higher-priority constraints.
- It could just be one of those edge cases that’s too hard for the naïve algorithm to handle.
Currently, Tabbycat doesn’t tell you which of these happened, so if the venue allocation fails to meet all your constraints, it’s on you to figure out why. In most scenarios, we imagine you’ll have few enough constraints that this will be obvious; for example, if the chief adjudicator is judging a team with accessibility requirements, it might be obvious that the latter’s constraint took priority. We might in future add support for more useful guidance on conflicting constraints, but we currently consider this to be of low priority.