Installing Locally on Windows
Is this the best installation method for you?
In most cases, we recommend doing an internet-based installation on Heroku instead. If you decide to do a local installation, be sure to read our page on local installations to help you understand what’s going on, particularly this section: Should I use a local installation?
If you just want to quickly set up a copy of Tabbycat to run locally on Windows, consider installing using Docker, which is a shorter process than the one below.
If you have Windows 10 and any experience with Linux, we recommend installing it on Linux on Windows (WSL) instead, which is much easier than the process below.
Requisite technical background
You need to be familiar with command-line interfaces to get through this comfortably. While a background in the specific tools Tabbycat uses (Python, PostgreSQL, etc.) will make things easier, it’s not necessary: we’ll talk you through the rest. You just need to be prepared to bear with us. It’ll take a while the first time, but it gets easier after that.
In these instructions, we’ll use Windows PowerShell, a command-line interface that comes with every installation of Windows (since XP). The easiest way to find it (on Windows 7 and later) is to search for it in your Start Menu. Every line in the instructions that begins with > is a command that you need to run in PowerShell, but without the >: that sign is a convention used in instructions to make it clear that it is a command you need to run.
Advanced users
Tabbycat is a Django project, so can be installed in any manner that Django projects can normally be installed. For example, if you prefer some SQL system other than PostgreSQL, you can use it so long as it’s Django-compatible. Just be aware that we haven’t tried it.
1. Install dependencies
First, you need to install all of the software on which Tabbycat depends, if you don’t already have it installed.
1(a). Python
Python is a popular programming language, and the language in which the core of Tabbycat is coded.
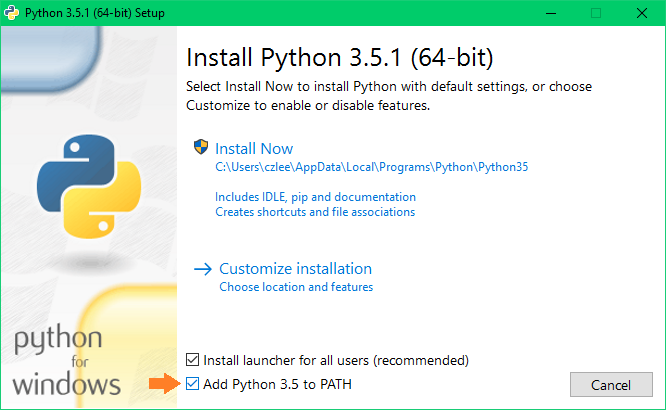
Download and install the latest version of Python 3.5 from the Python website. In the installer, check the box to add Python to your PATH (see box below).
Warning
The 64-bit version of Python 3.6 currently doesn’t work with PostgreSQL 9.6, because of a bug in Python affecting win-psycopg. If you’re using 64-bit Python, you should use Python 3.5 until the Python 3.6.1 is released.
Hint
Which file should I download?
- If you have 32-bit Windows, choose the “Windows x86 executable installer”.
- If you have 64-bit Windows (and not an Itanium processor), it’s better to choose the “Windows x86-64 executable installer”.
- If you’re not sure whether you have 32-bit or 64-bit Windows, consult “About your PC” or “System Properties” in your Start Menu.
Attention
Please take note: Just after you open the installer, check the “Add Python 3.5 to PATH” box:
To check that Python is installed correctly, open Windows PowerShell, type python and press Enter. It should look something like this. If you installed the 32-bit version, it will say 32 bit instead of 64 bit.
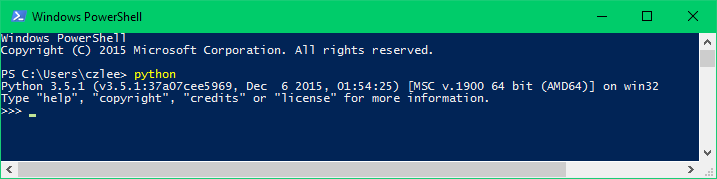
(To exit Python, type exit() then press Enter.)
Note
If you already have Python, great! Some things to double-check:
- You must have at least Python 3.5. (Python 2 is not supported.)
- Your installation path must not have any spaces in it.
- If that doesn’t work, note that the following must be part of your
PATHenvironment variable:C:\Python35;C:\Python35\Scripts(or as appropriate for your installation directory). Follow the instructions here to add this to your path.
1(b). PostgreSQL
PostgreSQL is a database management system.
Go to the PostgreSQL downloads page, then follow the link through to EnterpriseDB to download and install the latest version of PostgreSQL.
Tip
Once PostgreSQL is installed, the PostgreSQL service will run on your computer whenever you are using it. You might prefer to configure it so that it only runs when you want to run Tabbycat. To do this, open “Services” in your Control Panel on Windows, find the PostgreSQL service, and change its startup type to “Manual”. This will tell it not to start whenever you log in. Then, if you want to run the server (so you can use Tabbycat), you can do so from “Services” by selecting the PostgreSQL service and clicking “Start the service”.
1(c). Git
Git is a version control system.
We won’t use Git directly, but Node.js (which we install in the next step) requires Git to work. So, install the latest version for Windows from the Git website.
Advanced users
If you already have GitHub Desktop installed,
you might think that this would be good enough. Unfortunately, it’s
not—GitHub Desktop installs a portable version of Git. Node.js, on the other
hand, requires the git to be in the PATH, so it can call it directly.
The easiest (but not only) way to do this is just to install Git from the link
above.
1(d). Node.js/NPM
Node.js is a JavaScript runtime.
Download and run the node.js 8 Installer (.msi) for either x64 versions of Windows or x86 versions.
2. Get the source code
- Go to the page for our latest release.
- Download the zip file.
- Extract all files in it to a folder of your choice.
Advanced users
If you’ve used Git before, you might prefer to clone our GitHub repository instead. Don’t forget to check out the v2.1.3 tag or the master branch.
Even better, you might like to fork the repository first, to give yourself a little more freedom to make code changes on the fly (and potentially contribute them to the project).
3. Set up a new database
Hint
You can skip steps 2 and 3 if this is not your first installation. Every Tabbycat installation requires its own database, but they can use the same login role if you like.
- Open the pgAdmin tool, which you installed as part of installing PostgreSQL. In the object browser on the left, double-click the server marked “(localhost:5432)”. Log in using the password you set during installation.
- Right-click Login Roles, and click “New Login Role…”
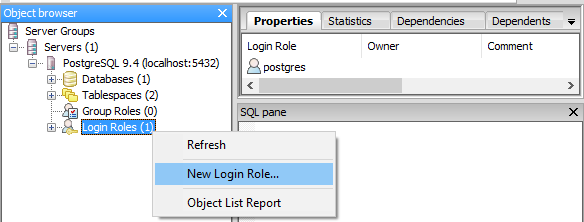
Fill in the New Login Role box as follows (everything not listed below can be left as-is):
- In the Properties tab, in Role Name, choose a user account name. (If you don’t know what to pick, we suggest “tabbycat”.)
- In the Definition tab, choose a Password and type it in Password (again).
Then click OK. (Remember this user name and password, you’ll need it later.)
Right-click Databases, and click “New Database…”
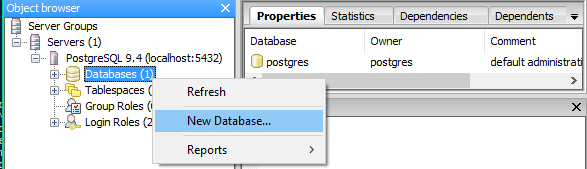
Fill in the New Database box as follows (everything not listed below can be left as-is):
- In the Properties tab, in Name, choose a database name (with no spaces in it).
- In the Properties tab, in Owner, type the name of the login role you just created.
Then click OK. (Remember the database name, you’ll need it later.)
4. Install Tabbycat
Almost there!
Open a Windows PowerShell. Navigate to the folder where you cloned/extracted Tabbycat. For example, if you installed it in
C:\Users\myusername\Documents\GitHub\tabbycat, then run:> Set-Location C:\Users\myusername\Documents\GitHub\tabbycat
Make a copy of local_settings.example and rename it to local_settings.py. Open your new local_settings.py. Find this part, and fill in the blanks (the empty quotation marks) as indicated:
DATABASES = {
    'default': {
        'ENGINE'  : 'django.db.backends.postgresql',
        'NAME'    : '',  # put your PostgreSQL database's name in here
        'USER'    : '',  # put your PostgreSQL login role's user name in here
        'PASSWORD': '',  # put your PostgreSQL login role's password in here
        'HOST':     'localhost',
        'PORT':     '5432',
    }
}
Optionally, replace the value in this line in the same file with your own time zone, as defined in the IANA time zone database (e.g.,
Pacific/Auckland,America/Mexico_City,Asia/Kuala_Lumpur):TIME_ZONE = 'Australia/Melbourne'
Start a new virtual environment. We suggest the name venv, though it can be any name you like:
> python -m venv venv
Run the Activate.ps1 script. This puts you “into” the virtual environment:
> .\venv\Scripts\Activate.ps1
Attention
If you get an error message saying that the script isn’t digitally signed, open a PowerShell with administrator privileges by right-clicking PowerShell in the Start meny and clicking “Run as administrator”. Then run this command:
> Set-ExecutionPolicy RemoteSignedRead the warning message, then type
yto confirm. By default, the execution policy on Windows isRestricted, which does not permit scripts likeactivateto be run. Changing it toRemoteSignedrelaxes it to allow local scripts to be run without checking the signature.
- Install Tabbycat’s requirements.
If you installed 32-bit Python:
> python -m pip install --upgrade pip
> easy_install http://www.stickpeople.com/projects/python/win-psycopg/2.6.1/psycopg2-2.6.1.win32-py3.5.exe
> pip install -r requirements_common.txt
> npm install
If you installed 64-bit Python:
> python -m pip install --upgrade pip
> easy_install http://www.stickpeople.com/projects/python/win-psycopg/2.6.1/psycopg2-2.6.1.win-amd64-py3.5.exe
> pip install -r requirements_common.txt
> npm install
If you’re using a version of Python other than 3.5, replace the URL in the second line with the appropriate link from the win-psycopg page.
Note
The second line above is an extra step just for Windows. It installs the Windows version of
psycopg2, win-psycopg, and must be done beforepip install -r requirements_common.txtso that the latter doesn’t try to install the Unix version.Hint
You might be wondering: I thought I already installed the requirements. Why am I installing more? And the answer is: Before, you were installing the requirements to create a Python virtual environment for Tabbycat to live in. Now, you’re in the virtual environment, and you’re installing everything required for Tabbycat to operate.
Initialize the database and create a user account for yourself:
> cd tabbycat
> dj migrate
> npm run build
> dj collectstatic
> dj createsuperuser
Start Tabbycat!
> dj runserverIt should show something like this:
Starting development server on http://127.0.0.1:8000
- Open your browser and go to the URL printed above. (In the above example, it’s http://127.0.0.1:8000/). It should look something like this:
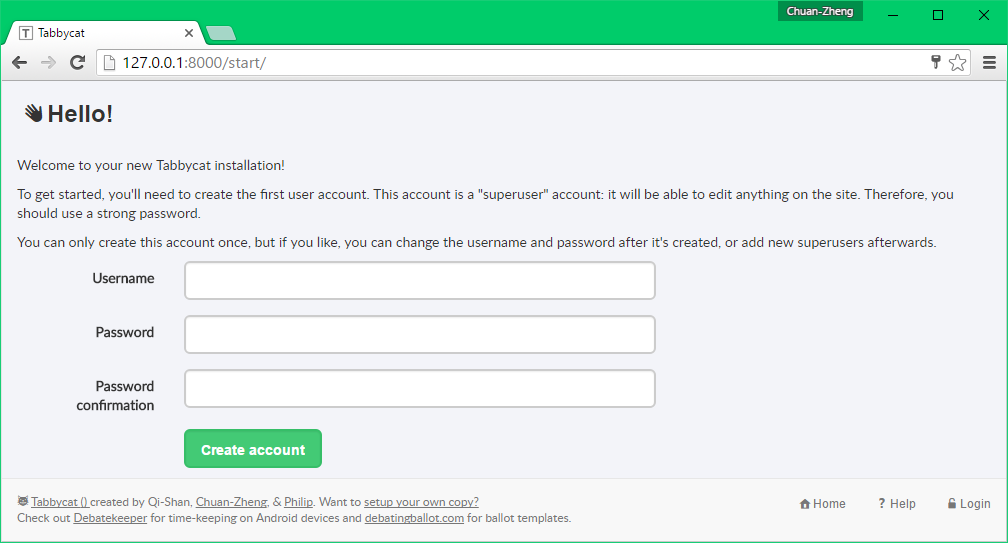
If it does, great! You’ve successfully installed Tabbycat.
Naturally, your database is currently empty, so proceed to importing initial data.
Starting up an existing Tabbycat instance
To start your Tabbycat instance up again next time you use your computer, open a PowerShell and:
> Set-Location C:\Users\myusername\Documents\GitHub\tabbycat # or wherever your installation is
> .\venv\Scripts\activate
> cd tabbycat
> dj runserver