Installing on Heroku
When running Tabbycat on the internet, we set it up on Heroku. The project is set up to be good to go on Heroku, and it works well for us, so if you’d like to run it online, we recommend that you do the same. Naturally, this requires you to have a Heroku account.
There are two ways to do this: a short way and a long way. Most people should use the short way. The long way requires some familiarity with command-line interfaces and Git, and requires a local installation as a prerequisite, but (unlike the short way) allows you to import data from CSV files.
The short way
Click this button:

This is the easiest way to deploy an instance of Tabbycat online. It requires no technical background.
If you don’t already have a Heroku account, it’ll prompt you to create one. Once you’re logged in to Heroku, choose a name for your installation, then scroll down and click Deploy. Once it’s finished, click View and follow the prompts. Once finished, open the site and from there you can easily set up a demo data set (if you just want to learn Tabbycat) or use the data importer to set up a real tournament.
Note
During the setup process, Heroku will ask you to verify your account by adding a credit card. A standard Tabbycat site will not charge your card — charges only accrue if you deliberately add a paid service in the Heroku dashboard.
If you can’t access a credit card, you can instead install a limited version, which we call “Tabbykitten”. However, Tabbykitten cannot send any e-mails or handle as much public traffic. We therefore strongly recommend it only as a last resort, and even then only for small tournaments. Use this link to set up a Tabbykitten site.
The long way
The long way sets you up with more control over your environment. Because you’ll clone our GitHub repository, it’ll be easier for you to pull and contribute updates to the source code. We recommend it if you have experience with Git. It’s also easier with this method to import CSV files using the command-line importer, so if you have a very large tournament, this might make importing initial data easier.
We’ve tested these instructions successfully on Windows, Linux and macOS.
Requisite technical background
You need to have at least a passing familiarity with command-line interfaces to get through the longer traditional method. We’ll talk you through the rest.
When we say “command shell”, on Windows we mean Command Prompt, and on Linux and macOS we mean Terminal (or your favourite command shell).
Advanced users
Tabbycat is a Django project. As such, it can be installed on any web platform that supports Django, using any SQL system that Django supports. Just be aware that we haven’t tried any other platform.
Short version of the long way
Warning
We provide a “short version” for experienced users. Don’t just copy-and-paste these commands before you understand what they do! If things aren’t set up perfectly they can fail, so it’s important to supervise them the first time you do them. If this is all new to you, read the long version of the instructions below.
git clone https://github.com/TabbycatDebate/tabbycat.git
cd tabbycat
git checkout v2.1.3                               # or master
python deploy_heroku.py <yourappname>
If you want to import tournament data from CSV files, install Tabbycat locally, put your CSV files in data/<yourtournamentname>, then:
createdb <yourlocaldatabasename>     # Your local_settings.py file must point here from DATABASES
dj migrate
dj createsuperuser
dj importtournament <yourtournamentname> --name <Your Tournament Name> --short-name <Tournament>
heroku maintenance:on
heroku pg:reset
heroku pg:push <yourlocaldatabasename> DATABASE
heroku maintenance:off
1. Install dependencies
- Install the Heroku Command Line Interface (CLI), then log in with the command
heroku login. - If you don’t already have Git, follow the instructions on the GitHub website to set up Git.
2. Set up a local installation
If you don’t already have a local installation, follow the instructions on the page for your operating system, listed below, to set up a local installation.
Attention
When downloading the source code, you must take the option involving cloning the GitHub repository using Git. In the macOS and Windows instructions, this means the option described in the “Advanced users” box. To do so, use these commands:
$ git clone https://github.com/TabbycatDebate/tabbycat.git
$ git checkout v2.1.3                              # or master
Do not download the .tar.gz or .zip file and extract it.
- Installing Locally on Linux
- Installing Locally on macOS
- Installing Locally on Linux on Windows (WSL)
- Installing Locally on Windows
If you do already have a local installation, update to the latest version using:
$ git checkout v2.1.3 # or master
Advanced users
It’s not strictly necessary to have a fully functional local installation if you don’t want to import data from CSV files. But it certainly helps.
3. Deploy to Heroku
Navigate to your Tabbycat directory:
cd path/to/my/tabbycat/directory
Run the script to deploy the app to Heroku. Replace
<yourappname>with your preferred URL. Your website will be at<yourappname>.herokuapp.com.
python deploy_heroku.py <yourappname>This script has other options that you might find useful. Run
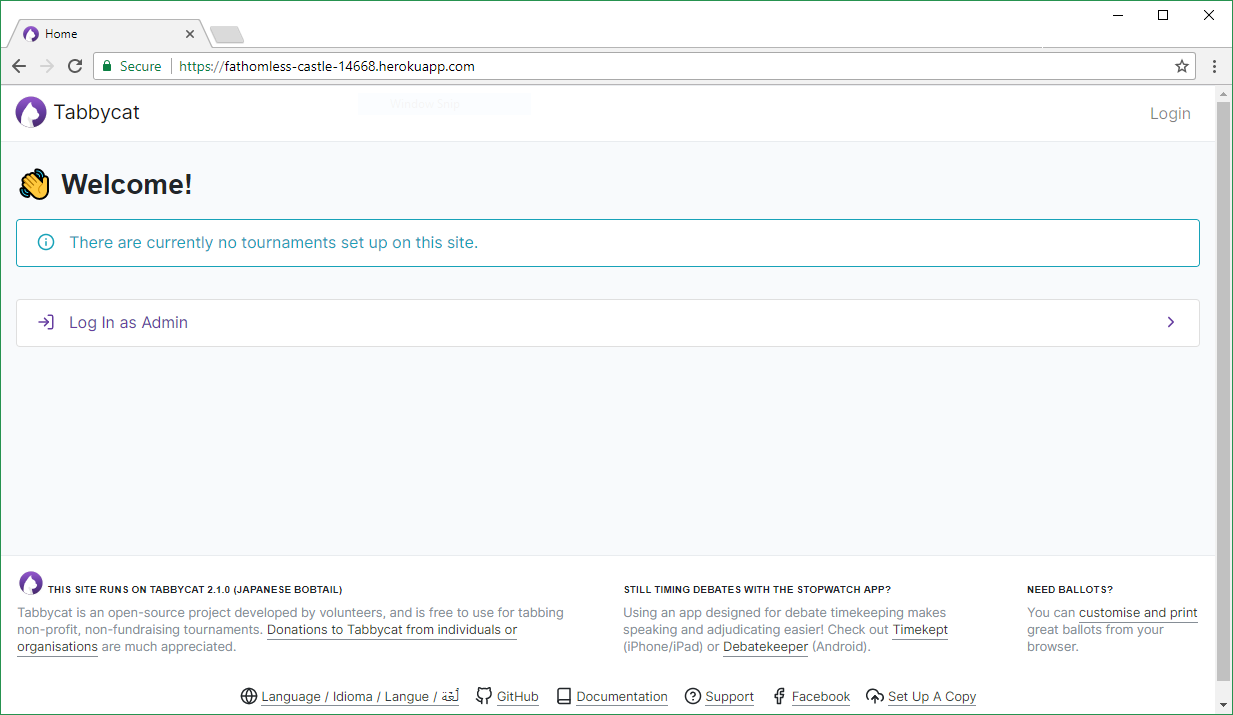
python deploy_heroku.py --helpfor details.When this script finishes, it will open the app in your browser. It should look something like this:
4. Import tournament data locally
Note
Steps 4 and 5 are optional; there are other methods of importing data. However the following method is most useful for large tournaments where manual entry would be tedious.
Note
Step 4 is the same as the process described in The importtournament command on local installations.
Place your CSV files in
data/yourtournamentname, as described in Importing Initial Data.Create a new, blank local database:
createdb <yourlocaldatabasename>
ReconfigureDATABASESin your local_settings.py file to point to this new database.
Activate your virtual environment:
source venv/bin/activate
Run initial migrations on your blank local database:
dj migrate
dj createsuperuser
Import your tournament data into your blank local database:
dj importtournament <yourtournamentname> --name <Your Tournament Name> --short-name <Tournament>
If your data’s not clean, it might take a few attempts to get this right. We recommend either destroying and recreating the database (dropdb,createdb), or wiping it usingdj flush, before retrying.
Check it looks like how you expect it to look, by starting your local installation:
dj runserver
5. Push the local database to Heroku
Once you’re happy with how your local import went, you can push the local database to Heroku.
Danger
This step wipes the Heroku database clean, and replaces it with the contents of your local database. If you have any data on the Heroku site that isn’t also in your local database, that data will be lost and will not be recoverable.
Tip
If you have multiple Heroku sites, you may find that the heroku commands refuse to run, prompting you to specify an app. If so, add --app <yourappname> to each heroku command.
Enable maintenance mode. This takes the site offline, to ensure that no-one can possibly create or change any data on the site while you’re pushing a new database up:
heroku maintenance:on
Reset the database. (Caution: This permanently deletes all information on your Heroku database!)
heroku pg:reset
Push your local database to Heroku:
heroku pg:push <yourlocaldatabasename> DATABASE
You might need to specify your local PostgreSQL credentials by addingPGUSER=<yourusername> PGPASSWORD=******** PGHOST=localhostto the beginning of that command. (This sets environment variables to those values for the duration of that one command.)
Disable maintenance mode:
heroku maintenance:off
Heroku options you may want to change
If you have a large tournament, you may want to customize your Heroku app. This section provides some guidance on upgrades and settings you may wish to consider. Some of these configurations require you to have the Heroku Command Line Interface (CLI) installed.
Upgrading your database size
The free plan of Heroku Postgres, “Hobby Dev”, should work for most small tournaments. For large tournaments, however, you may find that you exceed the 10,000-row limit of this plan. It’s difficult to give general guidance on how many rows you’re likely to use, because it depends on which features of Tabbycat you use (e.g., if you use adjudicator feedback). But to give some idea:
- Australs 2016, which had 74 teams, 8 preliminary rounds and heavily used adjudicator feedback, ended up at around 30,000 rows.
- The Asia BP championships 2017 had 100 teams, 6 preliminary rounds, and mandatory feedback (i.e. 100% return rates) used 15,000 rows.
- A 3 vs 3 tournament with 54 teams, 5 preliminary rounds, and which only lightly used adjudicator feedback ended up using around 4,500 rows
If you need more than 10,000 rows, you’ll need to upgrade to a paid Heroku Postgres Plan. The 10,000,000 rows allowed in the lowest paid plan, “Hobby Basic”, should certainly be more than sufficient.
If you’re not sure, you can always start at Hobby Dev—just be prepared to upgrade during the tournament if you run close to capacity.
Custom domain names
Your Heroku app will be available at yourappname.herokuapp.com. You may want it to be a subdomain of your tournament’s website, like tab.australasians2015.org. If so, you’ll need to configure your custom domain and SSL. Instructions for both are in the Heroku Dev Center:
The custom domain name basically requires two things: a DNS CNAME entry on your website targeting yourappname.herokuapp.com, and the custom domain configured on Heroku using heroku domains:add tab.yourwebsite.com. You’ll also need to provide an SSL certificate for your custom domain and add it using the heroku certs:add command.
HTTPS
All Tabbycat sites deployed to Heroku redirect all traffic to HTTPS by default.
For a myriad of reasons, we strongly advise against disabling this. But if for some reason you need to run on plain HTTP, you can do this by setting the DISABLE_HTTPS_REDIRECTS config variable in Heroku to disable (see Heroku documentation on config vars). The value of the config var must be disable; if it’s anything else, HTTPS redirects will remain in place.
Tip
Most modern browsers, after having been redirected by a site to HTTPS once, remember that that site requires HTTPS and go there for all subsequent visits even if the user typed in a plain http:// address. It may do this because it cached the HTTP 301 permanent redirect, stored an HSTS entry and/or tagged its session cookie to require HTTPS. If, after disabling HTTPS on your Tabbycat site, you find that you’re still being redirected to HTTPS, first try a browser or computer that hasn’t visited the site before. If that works, then remove the relevant entry from your (original) browser’s cache, HSTS set and cookies, and try again.
Time zone
If you want to change the time zone you nominated during deployment, you can do so by going to the Heroku Dashboard, clicking on your app, going to the Settings tab, clicking Reveal Config Vars and changing the value of the TIME_ZONE variable. This value must be one of the names in the IANA tz database, e.g. Pacific/Auckland, America/Mexico_City, Asia/Kuala_Lumpur. You can find a list of these on Wikipedia in the ‘TZ*’ column.